With our project set up, it’s time to introduce our player and start moving them around the world. Let’s take a look at the architecture of what we’ll be building:

We’re going to add two new nodes to our Game scene, the Player and an EventHandler. The player will be a sprite that displays the warrior in the units_spritesheet asset. The EventHandler will process keyboard events and return an Action.
What are Actions? Actions are standalone objects that encapsulate the information necessary to perform a series of instructions (“move here”, “use this item”, “quit the game”). In software design, this is known as the Command Pattern 1. We’ll set up our action system by creating a base Action, then inheriting an EscapeAction and MovementAction from it. More on that a little later.
The code for this part can be found at https://github.com/alexshopov/godot-roguelike-basic-set/tree/part-1
Player
Start by adding a Sprite2D as child of Game. Rename it Player.
Drag assets/spritesheets/unit_spritesheet.png into the Sprite2D -> Texture field.
Uncheck Sprite2D -> Offset -> Centered. This will position our sprite’s origin at the top left, simplifying grid-based movement.
Enable Sprite2D -> Region and set w := 16, h := 16. This will display a 16 x 16 pixel region of the spritesheet we loaded. In Part 3 we’ll use this to display different types of characters.

As we’re creating a tile-based game with a fixed tile size, we can modify the Godot 2D scene display to show an appropriately formatted grid. In the scene menu bar, press Shift + G or click the Use Grid Snap button to display the grid.

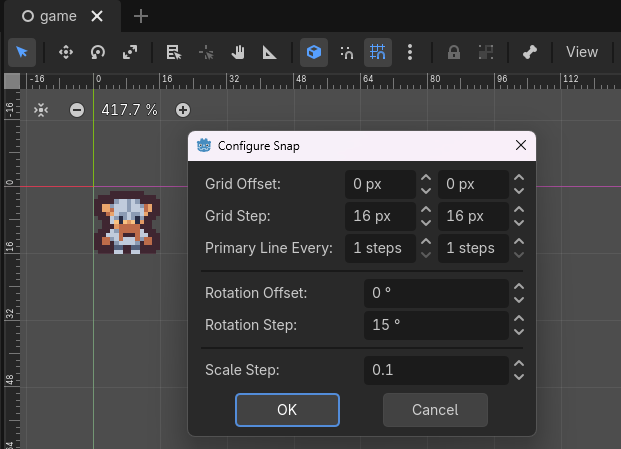
Click the three vertical dots next to Use Grid Snap to open the grid configuration panel.
Set Configure Snap -> Grid Step to 16, 16 to have the grid squares match our sprite size.
With the Player created, let’s write some code to position them in the center of the screen. Open game/game.gd and add the following lines:
Note: from here on I’ll be using diff notation to denote changes to existing code. If you’re not familiar with diff notation, the green lines indicate code that has been added, while red lines are code that has been deleted. An ellipses is used to omit blocks of code so we don’t need to show the entire file every time it’s updated.
class_name Gameextends Node+ const GAME_SIZE := Vector2i(40, 22)+ @onready var player : Sprite2D = $Playerfunc _ready() -> void: print("Welcome to the dungeon.")+ @warning_ignore("integer_division")+ var center := GAME_SIZE / 2+ player.global_position = center
We start by defining the size of game area in tiles, then add the Player node as an @onready variable.
...extends Node+ const GAME_SIZE := Vector2i(40, 22)+ @onready var player : Sprite2D = $Player...
In the _ready() function, we’ll calculate the center point of our tile grid and set the Player’s global position to that value. The @warning_ignore statement silences the Editor warning us that we have an integer in the denominator of our division operation.
...
print("Welcome to the dungeon")
+ @warning_ignore("integer_division")
+ var center := GAME_SIZE / 2
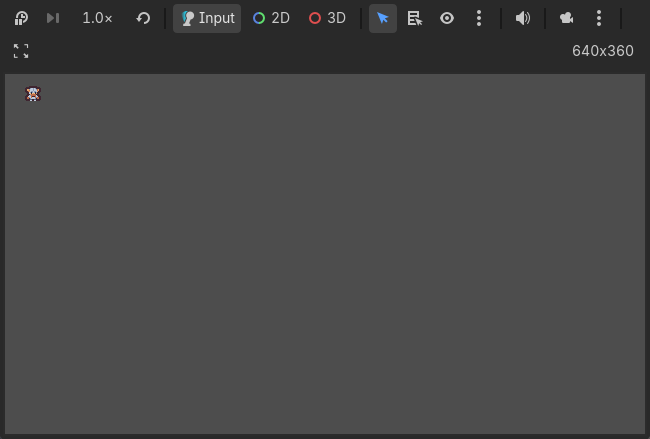
+ player.global_position = centerLet’s run the game. We can see our player sprite, but you may notice that they aren’t positioned in the center of the viewport as intended:
When we calculated the center of our game view, we did it relative to the game size in tiles, not the global screen size in pixels. To convert a tile position to a global position, we need to multiply the tile position by the size of a tile.
Add the following code to define a tile size and use it to convert the center tile position to a global viewport position:
class_name Gameextends Nodeconst GAME_SIZE := Vector2i(40, 22)+const TILE_SIZE := Vector2i(16, 16)func _ready() -> void: print("Welcome to the dungeon.") var center := GAME_SIZE / 2- player.global_position = center+ player.global_position = center * TILE_SIZE
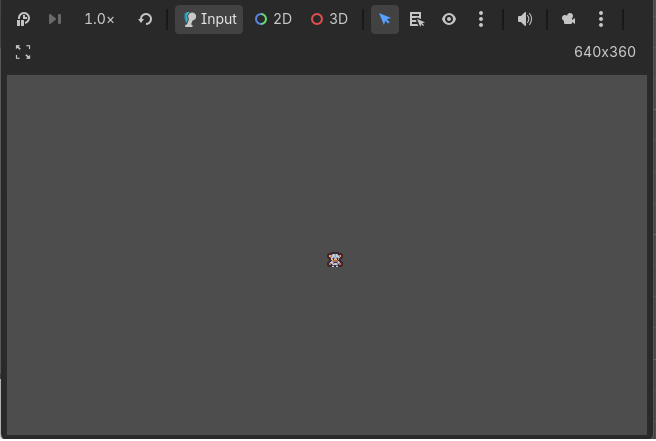
If you run the game now, you should see the Player positioned perfectly in the center of the screen.
The EventHandler and Player Actions
The Game, EventHandler, and Player are all nodes that persist in the scene tree throughout the life of the game. Actions, on the other hand, are constantly being created and destroyed in response to player input. Godot provides us with a lightweight object class called RefCounted 2 that we can use as the base for our Actions. RefCounted objects are effective for encapsulating data and logic, while not existing as part of the scene tree.
Create a new folder called actions. Add a new script called action.gd which inherits from RefCounted instead of Node.
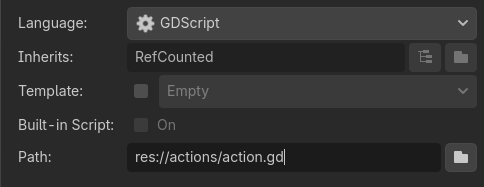
Add the following code to action.gd. The Action class contains the execute virtual method. The execute method will contain the actual logic we want the action to implement. As mentioned above, RefCounted objects are not part of the scene tree, so to give our Actions direct access to the various nodes they will be acting on, we’ll pass execute a reference to the root Game node.
class_name Actionextends RefCountedfunc execute(game: Game) -> void: pass
Create two more scripts, escape_action.gd and movement_action.gd, both extending from Action. Add the following code to the scripts:
class_name EscapeActionextends Actionfunc execute(game: Game) -> void: game.get_tree().quit()
class_name MovementActionextends Actionvar offset : Vector2ifunc _init(new_offset: Vector2i) -> void: offset = new_offsetfunc execute(game: Game) -> void: game.player.global_position += Vector2(offset * game.TILE_SIZE)
EscapeAction will be used to quit the game when the player presses the ESC key, while MovementAction will be used to move the player around the screen. Recall that the class_name statement registers these actions as global classes, so we’ll be able to check the type of an action to determine how to respond to it.
Speaking of MovementAction, let’s define the keys that will be used to move the player.
Open Project Settings -> Input Map.
Add four new actions: “move_up”, “move_left”, “move_down”, “move_right” and assign a key press to each. We’ll use the standard WASD keys.
Rather than continuing to fill our Game class with logic to handle different game events, we’re going to create a new node that can dispatch Actions in response to user input.
Create a folder called handlers. Add a new script that inherits from Node and name it event_handler.gd. Add the following code:
class_name EventHandlerextends Nodeconst DIRECTIONS := { "up": Vector2i.UP, "left": Vector2i.LEFT, "down": Vector2i.DOWN, "right": Vector2i.RIGHT}func handle_input_event(event: InputEvent) -> Action: if event is InputEventKey: return _handle_keyboard_event(event) return nullfunc _handle_keyboard_event(event: InputEventKey) -> Action: for direction: String in DIRECTIONS: if event.is_action_pressed("move_%s" % direction): return MovementAction.new(DIRECTIONS.get(direction)) if event.is_action_pressed("ui_cancel"): return EscapeAction.new() return null
Let’s go through this step by step. We start by registering our EventHandler as a global class.
class_name EventHandlerextends Node
Next, we’ll define a Dictionary that holds the four directions our player can move, along with a Vector2i representing each direction.
const DIRECTIONS := { "up": Vector2i.UP, "left": Vector2i.LEFT, "down": Vector2i.DOWN, "right": Vector2i.RIGHT}
Next, we define a function that implements our pattern of taking in a Godot InputEvent and returning an Action.
func handle_input_event(event: InputEvent) -> Action: if event is InputEventKey: return _handle_keyboard_event(event) return null
If the event is a key-press, we pass the event to the _handle_keyboard_event method, which will take a key-press and return an Action.
func _handle_keyboard_event(event: InputEventKey) -> Action:
So far, we’ve only defined the four key-press events corresponding to the directions our player can move. The method will traverse our DIRECTIONS dictionary, and use a Godot string interpolation to determine if the "move_" + direction string matches one of our mapped input events. If it’s a match, we’ll return a new MovementAction initialized with the corresponding direction.
    for direction: String in DIRECTIONS:
		if event.is_action_pressed("move_%s" % direction):
			return MovementAction.new(DIRECTIONS.get(direction))
If the key-press didn’t result in a MovementAction, we’ll next check if the ESC key was pressed, and return a new EscapeAction accordingly.
if event.is_action_pressed("ui_cancel"): return EscapeAction.new()
If any other key was pressed we’ll return null, and no Action will be taken.
Back in the scene view, add the EventHandler as a child of the Game node. Open game/game.gd and make the following changes:
class_name Gameextends Nodeconst GAME_SIZE := Vector2i(40, 22)const TILE_SIZE := Vector2i(16, 16)+ @onready var event_handler : EventHandler = $EventHandlerfunc _ready() -> void: print("Welcome to the dungeon.") @warning_ignore("integer_division") var center := GAME_SIZE / 2 player.global_position = center * TILE_SIZE+func _input(event: InputEvent) -> void:+ var action := event_handler.handle_input_event(event)+ if action:+ action.execute(self)
Many Godot tutorials handle player input in the _process method. The _process method runs every frame, so this would make sense for a real-time games that requires continuous input polling. We’re creating a turn-based, event-driven game, however. Instead of checking for input every frame, we can leverage Godot’s _input method which is called only in response to an input event 3.
Run the game. You should be able to move the Player around the screen using WASD. When you’re done trying that out, press ESC to quit the game.
Take a second to really appreciate the power of the Command Pattern. Our Game node doesn’t know or care what kind of Action is being returned from the EventHandler. It’s enough for it to take the Action and invoke the execute method, passing itself as a parameter. The Action will handle the rest. As we continue to add more nodes and handlers to the game, the Game class will effectively be nothing more than a list of nodes that can be passed to Actions, and the Actions, which will become more and more complex, can control the game as they see fit.
You now have a player and the framework for an abstract, event-driven action dispatcher with which to efficiently handle game events. Before we continue adding game features, we’re going to take a diversion in the next step to start setting up the ability to save and load our game. The TCOD tutorial upon which this series is based handles that in step 10, but as we need to create a bespoke save/load handler, we’re going to set up the framework for that early then iterate on it as we add a map, enemies, and other game state that need to be carried over from session to session.
References
The command pattern: https://gameprogrammingpatterns.com/command.html
Godot Node vs RefCounted: https://docs.godotengine.org/en/stable/tutorials/best_practices/node_alternatives.html
Godot Input examples: https://docs.godotengine.org/en/latest/tutorials/inputs/input_examples.html
